Let's get you started with Hopscotch Play! This guide will help you learn how to add clients, explore content, and use it with your clients, while introducing you to all of our exciting features designed to enhance your sessions.
Scroll through or use the links below to jump straight to the information you need.
- About Hopscotch Play
- Optimal Device Specs
- Provider Dashboard
- Creating a Client Profile
- Managing Client Profiles
- Finding Content
- Exploring and Playing Content
- Pinning Content
- Gameplay Features and Tools
- Using 2-Player
- Cancelling My Account
----
About Hopscotch Play
Hopscotch Play is a web-based platform that provides therapeutic content (games, activities, printables, etc.) for children between the ages of 5-18. Our content is designed by child and adolescent behavioral health experts and is based in evidence-based interventions.
Hopscotch Play is designed to be a valuable tool for in-person and virtual sessions, offering a range of activities you can easily access on your computer and use with clients during therapy.
In-person Sessions
For in-person sessions, you can use Hopscotch Play by visiting the website and pulling it up on a laptop, desktop, or tablet during your client session. Allow your client to navigate and engage with Hopscotch Play. Conduct session as you normally would, using Hopscotch Play game and activities to explore and process the presenting concern.
Virtual Sessions
For virtual sessions, you can use our innovative feature, 2-Player, with your clients. 2-Player makes it easy to engage virtually, allowing you and your client to explore interactive activities together, in real time, on separate devices. Learn more about using 2-Player with clients.
Optimal Device Specs for Using Hopscotch Play
Currently, Hopscotch Play is best experienced on a laptop, desktop, or tablet. Hopscotch Play does NOT currently support phones. See below for recommended device specs for a smooth experience.
For the best experience with Hopscotch Play, we recommend:
- An internet speed of 100 Mbps or higher for smooth streaming and gameplay
- A laptop, desktop, or tablet (NOT supported on phones)
- At least 8GB of memory and a recent processor (like Intel i5 or AMD Ryzen 5)
- Windows or Mac operating system
- Using Chrome, Safari, or Edge browsers
If your device doesn’t meet these specifications, you may experience slower load times and some lag during gameplay.
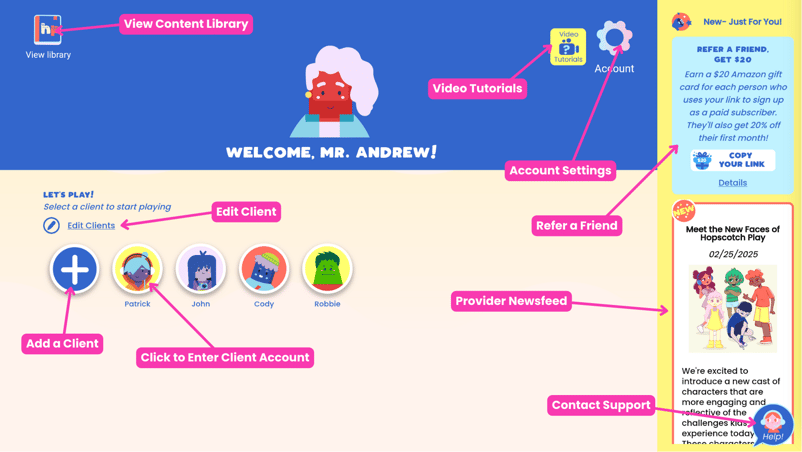
Provider Dashboard
Once you log in to your Hopscotch Play account, you'll land on your provider dashboard. This is your command center where you can:
> Access help materials
> Contact support
> Refer a Friend and earn!
> Add and Edit client profiles
> View Provider Newsfeed
> Enter client accounts and access games/activities
> Access account settings (billing, edit profile, reset PIN, agreements, and vote for features)
Editing Your Profile
After creating your Hopscotch Play account, you may want to make changes to your avatar, name, or PIN. This can be done by clicking on the Account icon and navigating to Edit Profile. Once there, you can Reset your PIN, choose a new avatar, or update your name. Once you press Save, your changes will be reflected on your provider dashboard.
Creating a Client Profile
To create an individualized client profile, you start by clicking the blue plus button to begin. This will bring up the Add Client pop-up. Start by adding a screen name for your client. This is the name that will show up on your client’s profile. Optionally, you can add first and last names. These only show up on your provider dashboard and are helpful with keeping your client profiles organized. You can browse through and select an avatar for this client.
Lastly, select the age range of your client and hit Save. Congratulations! You’ve created a client. You can see that their name and avatar are now on your provider dashboard.
Managing Client Profiles
To edit a client, click on Edit Clients. Here you can manage your Hopscotch Play caseload and make changes to individual client accounts. You can click and drag on this icon to reorder your clients. This changes the order in which they appear on your dashboard.
You can also click edit to make changes to each individual account. You can update your client's names, avatar, and age group. If you want to delete a client, click delete. Be aware that this is permanent and any saved progress with this client will be lost. Once you delete a client, their profile will be removed from your provider dashboard.
Finding Content
Welcome to your client’s profile and library! The library is designed to help you quickly find the right resources to use in your session. With just a few clicks, you can filter content to match your client’s specific needs.
To get started, choose the type of content you’d like to use. Simply click on any category to filter your results. You can also refine your search by setting a minimum and maximum age range. These age recommendations serve as a guide, but you can always use your discretion based on your client’s needs. Additionally, you can search by theme to focus on specific topics.
For example, if you’re working with a 7-year-old client on anxiety, you might set the minimum age to 6 and the maximum to 9, then select "Anxiety" as the theme. The library will then display content tailored to your client. If you need to start a new search or adjust your filters, simply click the X to remove them. And if there’s a specific activity you already have in mind, you can search for it by title. Our content library is ever-expanding and new content is added weekly!
Exploring and Playing Content
Once you’ve found the right piece of content for your client, it’s easy to get started. Each content card includes a content type, title, short description, and a play button. To jump straight into the game or activity, simply press Play.
If you’d like more details before starting, click More to open the content page. Here, you’ll find a longer description, therapeutic themes and tags, and the recommended age range. You’ll also see related resources that can supplement the activity. From this page, you can start the game anytime by clicking Play.
Pinning Content
Pinning is a useful feature that helps you quickly access content and makes session planning easier. Every piece of content in your client’s library can be pinned directly to their profile. To pin an item, simply look for the pin icon on the library page and click it. The icon will change, confirming that the resource has been pinned.
To view all the content you’ve pinned for a specific client, click View Pinned Content. This will display everything you’ve saved for easy access during sessions. You can also pin content from within the content page itself. Just click More to open the content, then select the pin icon to add it to your client’s profile.
Gameplay Features and Tools
Before playing a game with a client, we recommend exploring it on your own to become familiar with how it works. Once you enter a game, there are a few key features to notice.
First, every piece of content includes an “Info for Providers” dropdown. This is a private window that only you can see when using two-player mode with your client. Inside, you’ll find activity details, discussion questions, related resources, and pinned content—allowing you to seamlessly transition to another activity. To close this window, simply click the red arrow at the top.
On the right side, you’ll see a sidebar with additional features. Here, you can start two-player mode with your client. Depending on the game, you may also see:
-A Clear All button to reset progress.
-A Download button to save a PDF of the activity. This is helpful if you'd like to send the PDF virtually to a caregiver or upload it to the client's file in your EHR.
-Audio controls to adjust the volume or mute sounds.
Take some time to explore these features so you can guide your client through the best experience possible!
Using 2-Player
2-Player is a feature that allows you and your client to play games in real time from separate devices, either a computer or a tablet. Hopscotch Play does not currently support phones.
You’ll find the 2-Player widget throughout your client’s profile, making it easy to start a connection from anywhere. To begin, click the Play button on the widget, then select “Copy Link.” When the text changes to “Copied,” the link has been saved to your clipboard and is ready to be shared with your client.
When your client clicks the link on their device, both of you will be prompted to start 2-Player. Once they join, you'll receive a visual and auditory notification, and you’ll see that they are online. From this point, all interactions—drawing, typing, moving objects, and other gameplay actions—will stay in sync for both users.
In 2-Player, some features are only visible to you and will not be seen by your client. This includes the content filters on the main menu, the Info for Providers window, and certain toolbar options.
Important Notes for 2-Player:
-Minimizing the Hopscotch Play window or switching browser tabs on either end will temporarily pause the connection. Once the window is maximized, you both will be prompted to resume gameplay.
-Exiting your client’s profile at any time will end the session. If you leave, you will need to generate a new link for your client to reconnect. However, as long as you remain in the profile, the same link will stay active—even if your client disconnects.
-To manually end a 2-Player session, click the “End 2-Player” button. This will remove your client from the session.
If you experience any issues while using 2-Player, help is always just a click away. Use the Help icon to submit a support ticket, and include detailed comments or screenshots for faster troubleshooting.
Cancelling or Downgrading My Account
Thank you for giving Hopscotch Play a try! If you are interested in making changes to your account status, you can do so my accessing your Account settings (gear icon) at the top right of your Provider Dashboard.
Select Billing, and then select Delete Account. You will be given the option to instead downgrade your account to a Hopscotch Lite account. This ensures that your card on file will be deleted, and you are still able to access our full library of PDFs and upgrade at any time if you choose to do so in the future.
If you would like to proceed with cancellation, you are prompted to provide us a reason and let us know how we could have improved your experience! Once complete, your credit card on file will be removed and your account will be deleted. If you experience any issues, please do not hesitate to contact us through the Help button on your dashboard or email us directly at support@joinhopscotch.com.
- About Hopscotch Play
- Optimal Device Specs
- Provider Dashboard
- Creating a Client Profile
- Managing Client Profiles
- Finding Content
- Exploring and Playing Content
- Pinning Content
- Gameplay Features and Tools
- Using 2-Player
- Cancelling My Account
----
About Hopscotch Play
Hopscotch Play is a web-based platform that provides therapeutic content (games, activities, printables, etc.) for children between the ages of 5-18. Our content is designed by child and adolescent behavioral health experts and is based in evidence-based interventions.
Hopscotch Play is designed to be a valuable tool for in-person and virtual sessions, offering a range of activities you can easily access on your computer and use with clients during therapy.
In-person Sessions
For in-person sessions, you can use Hopscotch Play by visiting the website and pulling it up on a laptop, desktop, or tablet during your client session. Allow your client to navigate and engage with Hopscotch Play. Conduct session as you normally would, using Hopscotch Play game and activities to explore and process the presenting concern.
Virtual Sessions
For virtual sessions, you can use our innovative feature, 2-Player, with your clients. 2-Player makes it easy to engage virtually, allowing you and your client to explore interactive activities together, in real time, on separate devices. Learn more about using 2-Player with clients.
Optimal Device Specs for Using Hopscotch Play
Currently, Hopscotch Play is best experienced on a laptop, desktop, or tablet. Hopscotch Play does NOT currently support phones. See below for recommended device specs for a smooth experience.
For the best experience with Hopscotch Play, we recommend:
- An internet speed of 100 Mbps or higher for smooth streaming and gameplay
- A laptop, desktop, or tablet (NOT supported on phones)
- At least 8GB of memory and a recent processor (like Intel i5 or AMD Ryzen 5)
- Windows or Mac operating system
- Using Chrome, Safari, or Edge browsers
If your device doesn’t meet these specifications, you may experience slower load times and some lag during gameplay.
Provider Dashboard
Once you log in to your Hopscotch Play account, you'll land on your provider dashboard. This is your command center where you can:
> Access help materials> Contact support
> Refer a Friend and earn!
> Add and Edit client profiles
> Enter client accounts and access games/activities
> Access account settings (billing, edit profile, reset PIN, agreements, and vote for features)
Editing Your Profile
Creating a Client Profile
To create an individualized client profile, you start by clicking the blue plus button to begin. This will bring up the Add Client pop-up. Start by adding a screen name for your client. This is the name that will show up on your client’s profile. Optionally, you can add first and last names. These only show up on your provider dashboard and are helpful with keeping your client profiles organized. You can browse through and select an avatar for this client.
Lastly, select the age range of your client and hit Save. Congratulations! You’ve created a client. You can see that their name and avatar are now on your provider dashboard.
You can also click edit to make changes to each individual account. You can update your client's names, avatar, and age group. If you want to delete a client, click delete. Be aware that this is permanent and any saved progress with this client will be lost. Once you delete a client, their profile will be removed from your provider dashboard.
To get started, choose the type of content you’d like to use. Simply click on any category to filter your results. You can also refine your search by setting a minimum and maximum age range. These age recommendations serve as a guide, but you can always use your discretion based on your client’s needs. Additionally, you can search by theme to focus on specific topics.
For example, if you’re working with a 7-year-old client on anxiety, you might set the minimum age to 6 and the maximum to 9, then select "Anxiety" as the theme. The library will then display content tailored to your client. If you need to start a new search or adjust your filters, simply click the X to remove them. And if there’s a specific activity you already have in mind, you can search for it by title. Our content library is ever-expanding and new content is added weekly!
If you’d like more details before starting, click More to open the content page. Here, you’ll find a longer description, therapeutic themes and tags, and the recommended age range. You’ll also see related resources that can supplement the activity. From this page, you can start the game anytime by clicking Play.
To view all the content you’ve pinned for a specific client, click View Pinned Content. This will display everything you’ve saved for easy access during sessions. You can also pin content from within the content page itself. Just click More to open the content, then select the pin icon to add it to your client’s profile.
First, every piece of content includes an “Info for Providers” dropdown. This is a private window that only you can see when using two-player mode with your client. Inside, you’ll find activity details, discussion questions, related resources, and pinned content—allowing you to seamlessly transition to another activity. To close this window, simply click the red arrow at the top.
On the right side, you’ll see a sidebar with additional features. Here, you can start two-player mode with your client. Depending on the game, you may also see:
-A Clear All button to reset progress.
-A Download button to save a PDF of the activity. This is helpful if you'd like to send the PDF virtually to a caregiver or upload it to the client's file in your EHR.
-Audio controls to adjust the volume or mute sounds.
Take some time to explore these features so you can guide your client through the best experience possible!
2-Player is a feature that allows you and your client to play games in real time from separate devices, either a computer or a tablet. Hopscotch Play does not currently support phones.
You’ll find the 2-Player widget throughout your client’s profile, making it easy to start a connection from anywhere. To begin, click the Play button on the widget, then select “Copy Link.” When the text changes to “Copied,” the link has been saved to your clipboard and is ready to be shared with your client.
When your client clicks the link on their device, both of you will be prompted to start 2-Player. Once they join, you'll receive a visual and auditory notification, and you’ll see that they are online. From this point, all interactions—drawing, typing, moving objects, and other gameplay actions—will stay in sync for both users.
In 2-Player, some features are only visible to you and will not be seen by your client. This includes the content filters on the main menu, the Info for Providers window, and certain toolbar options.
Important Notes for 2-Player:
-Minimizing the Hopscotch Play window or switching browser tabs on either end will temporarily pause the connection. Once the window is maximized, you both will be prompted to resume gameplay.
-Exiting your client’s profile at any time will end the session. If you leave, you will need to generate a new link for your client to reconnect. However, as long as you remain in the profile, the same link will stay active—even if your client disconnects.
-To manually end a 2-Player session, click the “End 2-Player” button. This will remove your client from the session.
If you experience any issues while using 2-Player, help is always just a click away. Use the Help icon to submit a support ticket, and include detailed comments or screenshots for faster troubleshooting.
Cancelling or Downgrading My Account
Thank you for giving Hopscotch Play a try! If you are interested in making changes to your account status, you can do so my accessing your Account settings (gear icon) at the top right of your Provider Dashboard.
Select Billing, and then select Delete Account. You will be given the option to instead downgrade your account to a Hopscotch Lite account. This ensures that your card on file will be deleted, and you are still able to access our full library of PDFs and upgrade at any time if you choose to do so in the future.
If you would like to proceed with cancellation, you are prompted to provide us a reason and let us know how we could have improved your experience! Once complete, your credit card on file will be removed and your account will be deleted. If you experience any issues, please do not hesitate to contact us through the Help button on your dashboard or email us directly at support@joinhopscotch.com.